
Using RCM Cloud
- Using RCM Cloud
- Scheduling Overview and Workspace
- Scheduling Toolbar
- Scheduling Reservations / Appointments
- Cancelling Appointments/Reservations
- Arrive/Un-Arrive Patients
- Depart Patients
- Mark No-Show Patients
- Scheduling Appointment Tabs
- Scheduling Patient Tab
- Scheduling Visit Tab
- Scheduling Quick Actions
- Scheduling General Configuration
- Registration and the Registration Workspace
- Registration Work Queues
- Add New Patient
- Add Visit
- Register Pre-Admit Visit
- Registration Patient Tab
- Registration Patient Tab General Configuration
- Registration Visit Tab
- Registration Visit Tab General Configuration
- Registration Guarantor Tab
- Registration Insurance Tab
- Registration Insurance Tab General Configuration
- Registration Authorizations Tab
- Registration Authorizations Tab General Configuration
- Registration MSP Tab
- Registration Legal Tab
- Registration Workspace Quick Actions
- Medical Records Overview and Workspace
- Medical Records Abstracting Tab
- Medical Records Abstracting Tab General Configuration
- Medical Records Patient Tab
- Medical Records Patient Tab General Configuration
- Medical Records Quick Actions
- Collections Overview and Workspace
- Collection Collection Event Tab
- Collections Collection Event Tab General Configuration
- Collections Patient Tab
- Collections Patient Tab General Configuration
- Collections Insurance Tab
- Collections Insurance Tab General Configuration
- Collections Guarantor Tab
- Collections Guarantor Tab General Configuration
- Collections Visit Tab
- Collections Visit Tab General Configuration
- Collections Workspace Quick Actions
- Billing Overview and Workspace
- Billing Workspace Billing Event Tab
- Billing Workspace Billing Event Tab General Configuration
- Billing Patient Tab
- Billing Patient Tab General Configuration
- Billing Insurance Tab
- Billing Insurance Tab General Configuration
- Billing Guarantor Tab
- Billing Guarantor Tab General Configuration
- Billing Visit Tab
- Billing Visit Tab General Configuration
- Billing EOB/Denials Tab
- Billing Claim Error Tab
- Billing Quick Actions
- Payment Posting Overview and Workspace
- Payment Posting Work Queues
- Payment Posting General Configuration
- Payment Posting Line Item Detail Tab – Patient Payment
- Payment Posting Line Item Detail Tab – Insurance Payment
- Payment Posting Line Item Detail Tab General Configuration
- Payment Posting Insurance Tab
- Payment Posting Insurance General Configuration
- Payment Posting Visit Tab
- Payment Posting Visit Tab General Configuration
- Payment Posting Remit Detail Tab
- Payment Posting Quick Actions
- Master Application Security List
- Bed Board Search
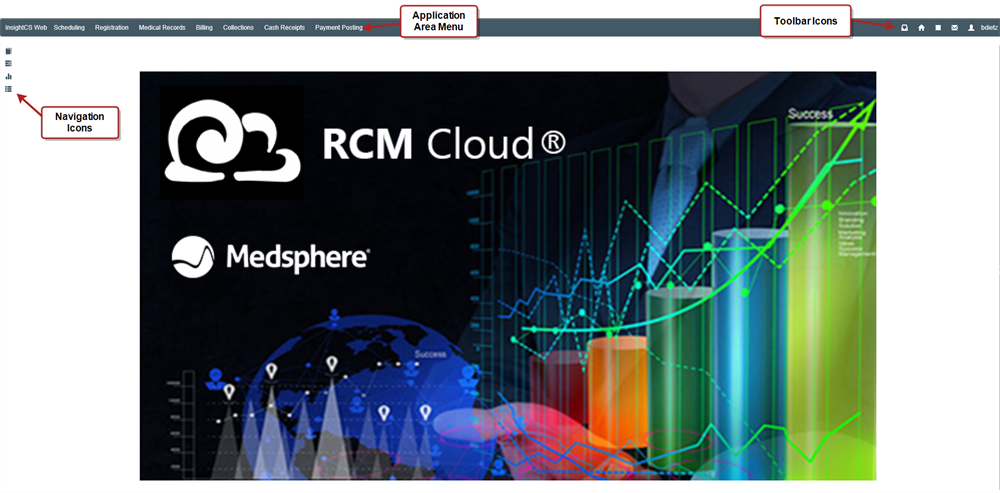
The welcome page is the main point of entry for the user upon launching RCM Cloud®, although the system can be configured to open a specific application area.
The welcome page is comprised of the following sections:
- Toolbar. Area at the top of the screen that includes the Application Area Menu and the Toolbar Icons.
- Application Area Menu. Any application area assigned to the user displays at the top left of the screen. Click these links to navigate between application areas (Collections, Registration, etc.). The application area’s workspace will display. For more information, see Application Area Menu.
- Toolbar Icons. Includes buttons for returning to the home page, logging out, displaying the active database, creating an e-mail to Stockell Support, and managing user profile settings. For more information, see Toolbar Icons.
- Navigation Icons/Menu. This menu is not enabled until an application area is selected. It contains the workspace, scorecard, dashboard, and reporting options for an application area. When you click on the icons, the navigation menu displays and allows you to select specific workspaces, dashboards, etc. For more information, see Navigation Icons/Menu.
- Navigation History. Links to previously accessed workspaces, dashboards, scorecards, etc. at the bottom of the screen.
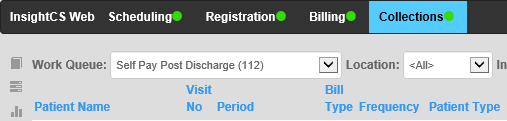
Application Area Menu
The menu displays any application area that has been assigned to the user. Click these links to navigate between application areas (Collections, Registration, etc.).
Toolbar Icons
The toolbar icons section contains buttons for returning to the home page, logging out, displaying the active database, creating an email to Stockell Support, and managing user profile settings.
![]()
Notifications button
The Notifications button ![]() is used to display notifications, such as an electronic insurance verification status message, to the user.
is used to display notifications, such as an electronic insurance verification status message, to the user.
Home button
The Home button ![]() is used to return the user to the main RCM Cloud® page or the home page defined in their User Profile.
is used to return the user to the main RCM Cloud® page or the home page defined in their User Profile.
Database Icon
The Database icon ![]() is used to view the database being used by RCM Cloud®. Hover over the icon, and the database name will display above the icon.
is used to view the database being used by RCM Cloud®. Hover over the icon, and the database name will display above the icon.

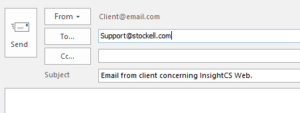
Support Email button
The Email button ![]() is used to create an email to Stockell Support. To create the email, click the button. An email is created using the user’s default email application, and it is automatically addressed to Support@stockell.com with a subject line of “Email from client concerning InsightCS Web.”
is used to create an email to Stockell Support. To create the email, click the button. An email is created using the user’s default email application, and it is automatically addressed to Support@stockell.com with a subject line of “Email from client concerning InsightCS Web.”
User Profile
The User Profile button ![]() is used to set a user’s home page and base location along with any registration defaults, which automatically populate the fields when a new patient or visit is created. To use the User Profile, follow these steps:
is used to set a user’s home page and base location along with any registration defaults, which automatically populate the fields when a new patient or visit is created. To use the User Profile, follow these steps:
- Click the User Profile button. The User Profile window displays.
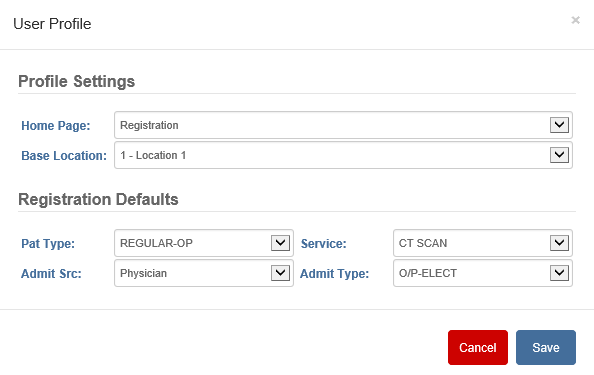
- Select any of the following profile settings or registration defaults:
- Home Page. Click the dropdown and select a home page (optional). This application area will launch automatically when you open an RCM Cloud® session or refresh your browser while in RCM Cloud®.
- Base Location. Defaults to the user’s base location. Click the dropdown and select a base location, which will be the user’s default location for location-specific functions.
- Pat Type. Click the dropdown and select the default patient type.
- Service. Click the dropdown and select the default service.
- Admit Src. Click the dropdown and select the default admission source.
- Admit Type. Click the dropdown and select the default admission type.
- Click Save.
User Login Name
The logged in user’s username displays to the right of the buttons/icons.
![]()
Navigating History Links
When navigating from a workspace option to a dashboard to a scorecard, etc., a history link for the previously selected option displays at the bottom of the page. To return to one of those options without using the navigation menu, click the navigation history link.

General RCM Cloud Configurations Options
Automatic Height-Weight Checks
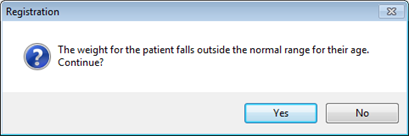
RCM Cloud® can perform automatic reasonability checks on the patient’s height and weight compared to his or her age by enabling the Global Registry key HEIGHT_WEIGHT_CHECKS. The check is based on Centers for Disease Control and Prevention growth charts or facility-defined charts and can reduce height and weight input errors.
If the height/weight entered varies from the defined chart, a warning message displays when OK is clicked. Click Yes to continue or No to change the height and weight.
Configuration
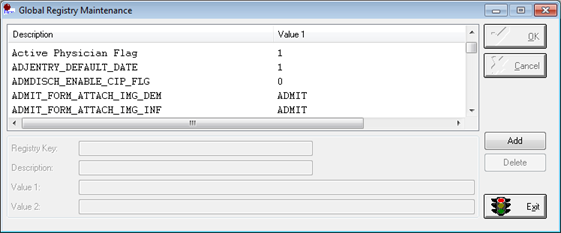
For this configuration, use the key(s) in Global Registry Maintenance with the settings described in the table below.
| Global Registry Key | Description | |||||
|---|---|---|---|---|---|---|
| HEIGHT_WEIGHT_CHECKS | Enables or disables reasonability checks for a patient’s height and weight. | |||||
|
Determine Location’s Time Zone
If an organization uses a single system with locations in multiple time zones, each location’s time bias will need to be set using the Location A specific site or facility. Registry key LOCAL_TIME_BIAS. This setting, which is the location’s offset in hours from Greenwich Mean Time, allows local users to enter and view dates and times for their current time zone. Otherwise, they would see the system’s time (according to the Citrix® or SQL server), which is still used for create and modify dates/times and for effective dates/times for master files.
Date/time defaults and checks for future or past date/times will take the offset into account, and the key accommodates automatic changes for Daylight Saving Time. For North American time zones, the offset will be a negative number. For example, for the U.S. central time zone, the entry is -6 (minus 6 hours from GMT).
Configuration
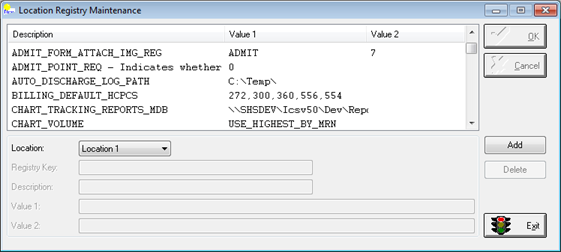
For this configuration, use the key(s) in Location Registry Maintenance with the settings described in the table below.

| Location Registry Key | Description | |||||||||
|---|---|---|---|---|---|---|---|---|---|---|
| LOCAL_TIME_BIAS | Defines the time zone for the location as an offset of Greenwich Mean Time in Value 1 (for example, if the location is in the U.S. central time zone, Value 1 is -6.) and determined whether the location observes Daylight Saving Time in Value 2. | |||||||||
|
Determine Maximum Visit Number Size
The maximum number of characters allowed for visit numbers can be determined using a Global Registry key. The limits can vary depending on whether RCM Cloud® or an external system is used for registration.
The limit is set using the Global Registry key VISITNO_SIZE. If RCM Cloud® is the facility’s registration system, the recommended maximum to enter into Value 1 is 9. If an external system is the registration system, the maximum is 20.
Configuration
For this configuration, use the key(s) in Global Registry Maintenance with the settings described in the table below.

| Global Registry Key | Description | |||
|---|---|---|---|---|
| VISITNO_SIZE | Determines how many characters are allowed in the visit number. If RCM Cloud® is the facility’s registration system, the maximum that can be entered into Value 1 is 9. If an external system is the registration system, the maximum is 20. | |||
|
Metric Weight Measurement Display Options
The Weight section in multiple tabs throughout RCM Cloud® can be configured to display kilograms or grams along with pounds and ounces by using the LocationA specific site or facility. Registry key METRIC_WEIGHT_DISPLAY. Displaying the weight in grams is the default option when the Location Registry key does not exist or does not have a value. Kilograms is a universal measurement used with dosing medications and other patient care items that include, but may not be limited to, equipment size. Its use could help avoid unnecessary errors.
Configuration
For this configuration, use the key(s) in Location Registry Maintenance with the settings described in the table below.
| Location Registry Key | Description | |||||||
|---|---|---|---|---|---|---|---|---|
| METRIC_WEIGHT_DISPLAY | Determines whether the patient’s weight displays in kilograms or grams along with pounds and ounces in the Weight section of multiple applications. | |||||||
|
