
Scheduling Reservations / Appointments
- Using RCM Cloud
- Scheduling Overview and Workspace
- Scheduling Toolbar
- Scheduling Reservations / Appointments
- Cancelling Appointments/Reservations
- Arrive/Un-Arrive Patients
- Depart Patients
- Mark No-Show Patients
- Scheduling Appointment Tabs
- Scheduling Patient Tab
- Scheduling Visit Tab
- Scheduling Quick Actions
- Scheduling General Configuration
- Registration and the Registration Workspace
- Registration Work Queues
- Add New Patient
- Add Visit
- Register Pre-Admit Visit
- Registration Patient Tab
- Registration Patient Tab General Configuration
- Registration Visit Tab
- Registration Visit Tab General Configuration
- Registration Guarantor Tab
- Registration Insurance Tab
- Registration Insurance Tab General Configuration
- Registration Authorizations Tab
- Registration Authorizations Tab General Configuration
- Registration MSP Tab
- Registration Legal Tab
- Registration Workspace Quick Actions
- Medical Records Overview and Workspace
- Medical Records Abstracting Tab
- Medical Records Abstracting Tab General Configuration
- Medical Records Patient Tab
- Medical Records Patient Tab General Configuration
- Medical Records Quick Actions
- Collections Overview and Workspace
- Collection Collection Event Tab
- Collections Collection Event Tab General Configuration
- Collections Patient Tab
- Collections Patient Tab General Configuration
- Collections Insurance Tab
- Collections Insurance Tab General Configuration
- Collections Guarantor Tab
- Collections Guarantor Tab General Configuration
- Collections Visit Tab
- Collections Visit Tab General Configuration
- Collections Workspace Quick Actions
- Billing Overview and Workspace
- Billing Workspace Billing Event Tab
- Billing Workspace Billing Event Tab General Configuration
- Billing Patient Tab
- Billing Patient Tab General Configuration
- Billing Insurance Tab
- Billing Insurance Tab General Configuration
- Billing Guarantor Tab
- Billing Guarantor Tab General Configuration
- Billing Visit Tab
- Billing Visit Tab General Configuration
- Billing EOB/Denials Tab
- Billing Claim Error Tab
- Billing Quick Actions
- Payment Posting Overview and Workspace
- Payment Posting Work Queues
- Payment Posting General Configuration
- Payment Posting Line Item Detail Tab – Patient Payment
- Payment Posting Line Item Detail Tab – Insurance Payment
- Payment Posting Line Item Detail Tab General Configuration
- Payment Posting Insurance Tab
- Payment Posting Insurance General Configuration
- Payment Posting Visit Tab
- Payment Posting Visit Tab General Configuration
- Payment Posting Remit Detail Tab
- Payment Posting Quick Actions
- Master Application Security List
- Bed Board Search
Appointments associate a patient with an item, time slot, and resources in Scheduling. A reservation is a reserved time slot for a test that serves as a placeholder for the primary resource assigned to the item, reserving that resource’s time to avoid scheduling conflicts.
Both begin by placing an item in the Appointment Scheduler, which launches the Scheduling wizard and allows you to quickly create a reservation or a full appointment. An appointment is created by adding a patient/visit to a reservation. This process can be performed at separate times or all at once, and new patients or new visits can be created as part of adding the appointment.
The views, toolbar options, and QuickPick lists ultimately set up an easy-to-use process for scheduling an appointment for a patient or resource. Appointments can be created by the following methods:
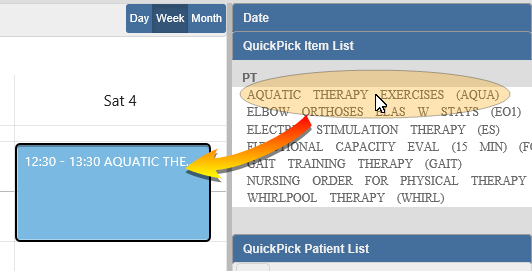
- Schedule by drag and drop – Items can be dragged and dropped from the QuickPick Item List directly onto the Appointment Scheduler to launch the wizard with the department and item supplied. Patients are then dragged and dropped from the QuickPick Patients list into the reservation to create an appointment.
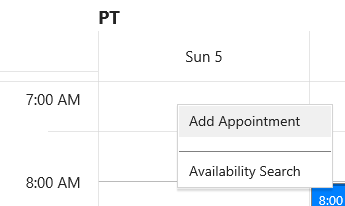
- Right+Click in Scheduler. Right+click on a time slot on the Appointment Scheduler and select Add Appointment. This will launch the wizard, and the user will need to supply the item.
Both methods will launch the Scheduling wizard, which guides the user through completing the reservation or appointment. Depending on the type of view used, the wizard may open at different stages.
Schedule by Appointment View
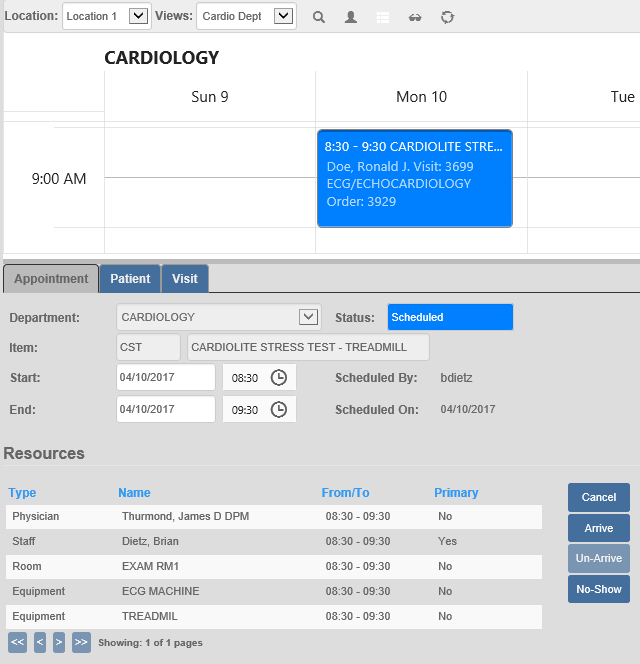
Appointment views display the schedule for an entire department (Laboratory, Cardiology, etc.) with the department name displayed above the Appointment Scheduler. When an item is scheduled in an appointment view, all resources for the selected item are booked automatically.
For example, if an exercise stress test item involves a staff member, monitoring physician, treadmill and electrocardiogram equipment, and an exam room, an appointment view will schedule all of those resources automatically.
Schedule by Resource View
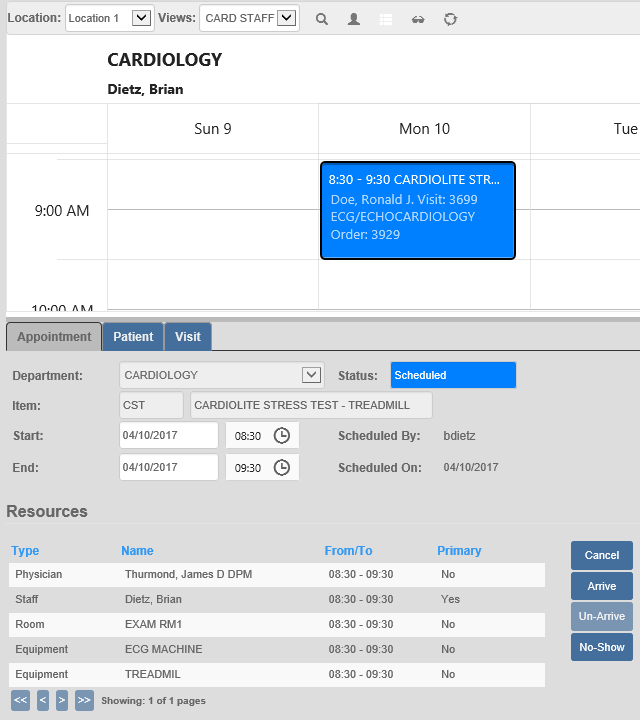
Resource views display the schedule for a specific resource (physician, staff, equipment, or room), with the resource’s name displayed under the department name above the Appointment Scheduler. When an item is scheduled in a resource view, the primary resource is scheduled manually, while secondary resources for the selected item are booked automatically.
For example, if an exercise stress test item has a staff member as the primary resource, you can add the reservation/appointment for the resource, and the monitoring physician, treadmill and electrocardiogram equipment, and exam room are scheduled automatically. This gives the user the ability to manage specific resources and their schedules.
Schedule Reservations
Reservations can be scheduled by drag and drop or by right+clicking in the Appointment Scheduler. The reservation is created in the Scheduling wizard, which guides the user through the process. However, depending on the view used (appointment or resource) and whether you create the reservation by drag and drop or in the scheduler.
Schedule a Reservation
To schedule a reservation, follow these steps:
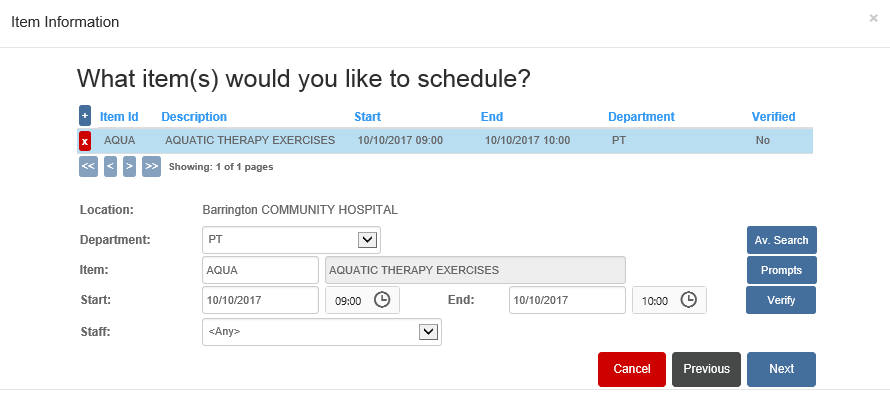
- Select an item in the QuickPick Items List, hold down the mouse button, drag it to a time slot on the Appointment Scheduler, and release the mouse button to drop the item onto the scheduler or right+click in the time slot on the scheduler and select Add Appointment. The Scheduling wizard opens to the Item Information page.

- Location – Displays the location for the department.
- Department – Displays the selected department. Click the dropdown to change the department.
- Item – For drag-and-drop scheduling, this field will be populated. If added in the scheduler, the item will need to be added. Enter an item ID in the first field or an item description in the autocomplete field (clicking a suggested description to select it). For more information, see Autocomplete Fields.
- Start/End – Enter the start time for the appointment. Click the field to enter the date directly or click to select a date from a calendar. Then enter the time directly or click the clock icon to select a time. The End date/time defaults to the length of the item.
- Staff – In a resource view, the dropdown will default to the selected resource. In an appointment view, the dropdown will default to Any and includes any resources eligible to be scheduled for the item. Click the dropdown to select a specific resource.
- Click any of the following options, if needed:
- Av. Search – Click to launch the Availability Search to help select available times for the appointment.
- Prompts – Click to answer prompts specific to the item in the Prompts window. Note that when you click Next after completing the prompts, the wizard will advance to the Visit Search page.
- Verify – Click to verify that the item can be scheduled at the selected time. The verification checks the department availability, item availability, resource availability, and for conflicting appointments.
- Click Next. The Appointment Type page displays.

- Select an option for the appointment type:
- Individual. Select for an individual appointment.
- Group. Select for a group appointment, meaning more than one visit/patient can be added. The Max Visits field is enabled.
- Max Visits. If the scheduled item is configured as a group item, this field will display its default maximum visits. If not, enter the maximum number of visits that can bee added to the appointment.
- Click Next. The reservation or appointment page displays.
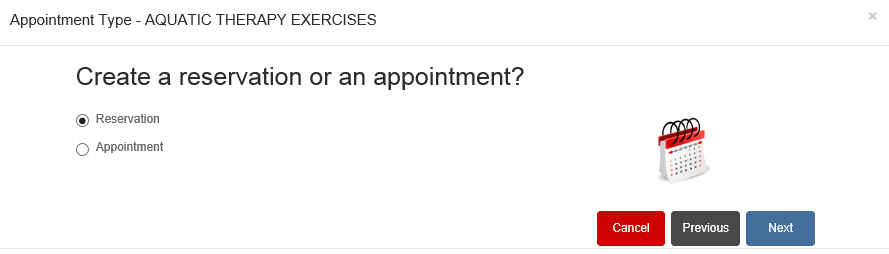
- Select Reservation.
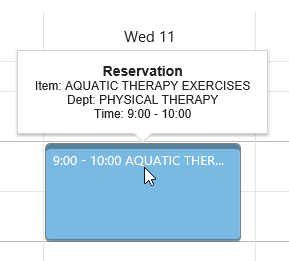
- Click Next. The reservation is added to the Appointment Scheduler. The reservation is simply a reserved time slot for a test and a placeholder for the primary resource assigned to the test. A patient must be added to complete the full appointment.
Schedule Individual Appointments
Appointments can be scheduled by drag and drop to an existing reservation or by right+clicking on a reservation in the Appointment Scheduler. Both options use the scheduling wizard, which guides the user through the process. Once a visit is added to an individual reservation, it becomes an appointment.
Schedule an Individual Appointment
To schedule an appointment, follow these steps:
- Select an item in the QuickPick Items List, hold down the mouse button, drag it to a time slot on the Appointment Scheduler, and release the mouse button to drop the item onto the scheduler or right+click in the time slot on the scheduler and select Add Appointment. The Scheduling wizard opens to the Item Information page.
- Location – Displays the location for the department.
- Department – Displays the selected department. Click the dropdown to change the department.
- Item – For drag-and-drop scheduling, this field will be populated. If added in the scheduler, the item will need to be added. Enter an item ID in the first field or an item description in the autocomplete field (clicking a suggested description to select it). For more information, see Autocomplete Fields.
- Start/End – Enter the start time for the appointment. Click the field to enter the date directly or click to select a date from a calendar. Then enter the time directly or click the clock icon to select a time. The End date/time defaults to the length of the item.
- Staff – In a resource view, the dropdown will default to the selected resource. In an appointment view, the dropdown will default to Any and includes any resources eligible to be scheduled for the item. Click the dropdown to select a specific resource.
- Click any of the following options, if needed:
- Av. Search – Click to launch the Availability Search to help select available times for the appointment.
- Prompts – Click to answer prompts specific to the item in the Prompts window. Note that when you click Next after completing the prompts, the wizard will advance to the Visit Search page.
- Verify – Click to verify that the item can be scheduled at the selected time. The verification checks the department availability, item availability, resource availability, and for conflicting appointments.
- Click Next. The Appointment Type page displays.

- Select an option for the appointment type:
- Individual – Select for an individual appointment.
- Group – Select for a group appointment, meaning more than one visit/patient can be added. The Max Visits field is enabled.
- Max Visits – If the scheduled item is configured as a group item, this field will display its default maximum visits. If not, enter the maximum number of visits that can bee added to the appointment.
- Click Next. The Appointment Type reservation or appointment page displays.
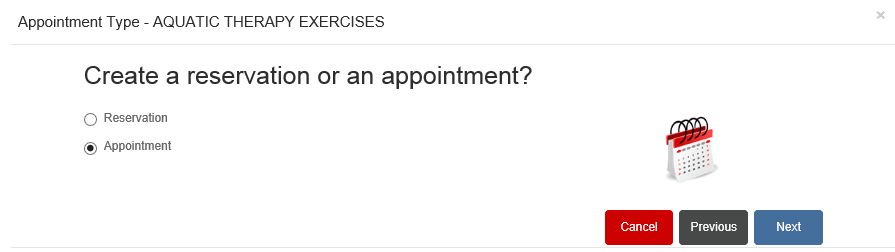
- Select Appointment.
- Click Next. The Visit Search page displays. This page also displays if you right+click on a reservation and select Add Visit.

- Select a visit via one of the following options:
- Search for existing patient/visit. Use the visit search to identify an existing patient/visit and add him or her to the reservation.
- Add visit for existing patient. Use the patient search to identify an existing patient and add a new visit that will be added to the reservation.
- Add a new patient and visit. Create a new patient and add a visit.
- If scheduling by dragging and dropping a visit on a reservation, the wizard opens to this page. If the visit already has an admitting diagnosis, it displays on the page. If not, enter the diagnosis by one of the following methods:
- Diagnosis – Enter a diagnosis code in the first field or a diagnosis description in the autocomplete field (clicking a suggested description to select it).
- Freeform – Enter free-form text into the field.
- Click Next. The Recurrence Options page displays.
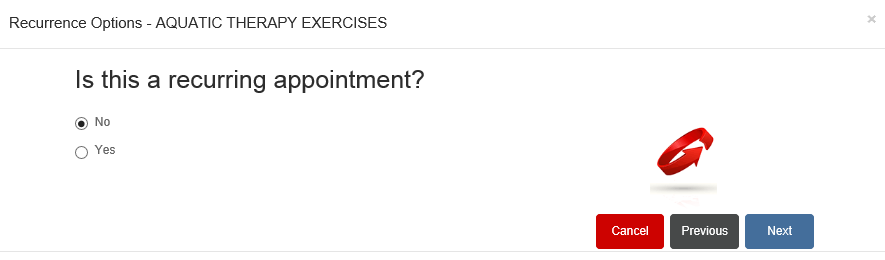
- Select an option for the recurring appointment:
- No – Select to create the appointment upon clicking Next.
- Yes – Select to enter recurring appointment information upon clicking Next.
- Click Next. The appointment is added to the Appointment Scheduler.
The following windows may also display:
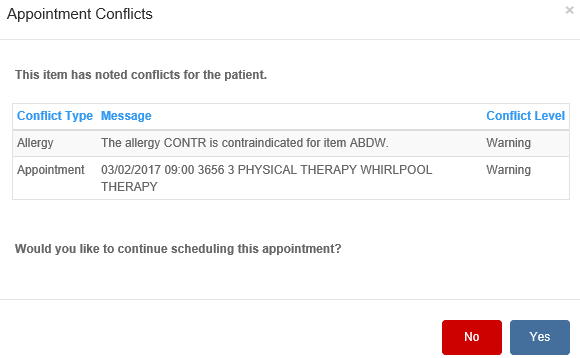
- Time and Item Conflicts – If the patient’s appointment conflicts with another appointment because of the time scheduled or because of the item scheduled, the conflict displays in the Appointment Conflicts window. Click Yes to continue ordering the item or click No to cancel.
- Warnings – Any warnings for allergy, diabetic, male/female, or pregnancy conflicts with the item display in the Appointment Conflicts window. Click Yes to continue ordering the item or click No to cancel.
- Medical Necessity Check Failed – If Medical Necessity Checking is being used, the item will be checked against the visit diagnosis for a conflict.
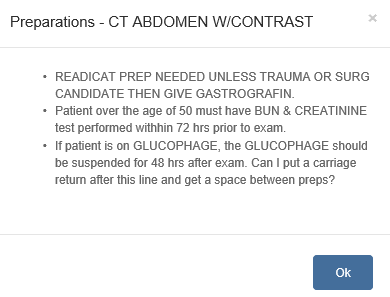
- Item Preparations – If any preparations are associated with the item, they display in a read-only window and inform the patient or staff. Click OK to close the message.
Schedule Group Appointments
Group appointments can only be created as reservations, and then visits can be added by drag and drop or by right+clicking on the reservation in the Appointment Scheduler. Both options use the scheduling wizard, which guides the user through the process. Once a visit is added to a group reservation, it becomes an appointment.
Items can be set up to be group appointments by default in Item Maintenance. Group appointments cannot be set up as recurring.
Schedule a Group Appointment Reservation
To schedule a group appointment reservation, follow these steps:
- Select an item in the QuickPick Items List, hold down the mouse button, drag it to a time slot on the Appointment Scheduler, and release the mouse button to drop the item onto the scheduler or right+click in the time slot on the scheduler and select Add Appointment. The Scheduling wizard opens to the Item Information page.

- Location – Displays the location for the department.
- Department – Displays the selected department. Click the dropdown to change the department.
- Item – For drag-and-drop scheduling, this field will be populated. If added in the scheduler, the item will need to be added. Enter an item ID in the first field or an item description in the autocomplete field (clicking a suggested description to select it).
- Start/End – Enter the start time for the appointment. Click the field to enter the date directly or click to select a date from a calendar. Then enter the time directly or click the clock icon to select a time. The End date/time defaults to the length of the item.
- Staff – In a resource view, the dropdown will default to the selected resource. In an appointment view, the dropdown will default to Any and includes any resources eligible to be scheduled for the item. Click the dropdown to select a specific resource.
- Click any of the following options, if needed:
- Av. Search – Click to launch the Availability Search to help select available times for the appointment.
- Prompts – Click to answer prompts specific to the item in the Prompts window. Note that when you click Next after completing the prompts, the wizard will advance to the Visit Search page.
- Verify – Click to verify that the item can be scheduled at the selected time. The verification checks the department availability, item availability, resource availability, and for conflicting appointments.
- Click Next. The Appointment Type page displays.

- Select an option for the appointment type:
- Individual – Select for an individual appointment.
- Group – Select for a group appointment, meaning more than one visit/patient can be added. The Max Visits field is enabled.
- Max Visits – If the scheduled item is configured as a group item, this field will display its default maximum visits. If not, enter the maximum number of visits that can bee added to the appointment.
- Click Next. The group reservation is added to the Appointment Scheduler.
- Click Next. The Visit Search page displays. This page also displays if you right+click on a reservation and select Add Visit.
Add Visits to Group Reservation by Drag and Drop
To schedule a group appointment by drag and drop to an existing reservation in the Appointment Scheduler, follow these steps:
- Locate the visit in the QuickPick Patient List. The list displays patients by nursing station or those who were recently admitted.

- Click on the patient in the QuickPick Patient List, hold down the mouse button, and drag it toward a reservation on the Appointment Scheduler.
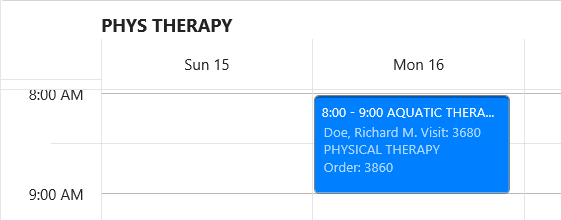
- Once over the reservation, release the mouse button to drop the item into the reservation. The patient is added to the appointment, the group appointment icon displays on the appointment, and the appointment displays with the “Scheduled” color coding in the Appointment Scheduler.

The following windows may also display:
- Time and Item Conflicts – If the patient’s appointment conflicts with another appointment because of the time scheduled or because of the item scheduled, the conflict displays in the Appointment Conflicts window. Click Yes to continue ordering the item or click No to cancel.
- Warnings – Any warnings for allergy, diabetic, male/female, or pregnancy conflicts with the item display in the Appointment Conflicts window. Click Yes to continue ordering the item or click No to cancel.

- Medical Necessity Check Failed – If Medical Necessity Checking is being used, the item will be checked against the visit diagnosis for a conflict. For more information, see Medical Necessity Checking.
- Item Preparations – If any preparations are associated with the item, they display in a read-only window and inform the patient or staff. Click OK to close the message.

Add Visits to Group Reservation in Appointment Scheduler
To schedule a group appointment by adding a visit to an existing reservation in the Appointment Scheduler, follow these steps:
- Right+click on the reservation in the Appointment Scheduler. The menu displays with the Add Visit option.

- Click Add Visit. The Visit Search page displays.
![]()
Select a visit via one of the following options:
- Search for existing patient/visit – Use the visit search to identify an existing patient/visit and add him or her to the reservation.
- Enter any or a combination of the following
- Last, First, and MI – Enter at least one letter of the patient or guarantor’s name in one of the name fields. More information entered in the name fields leads to a more targeted search result set. The search results display faster, and a smaller result set is easier to read.
Note: The search includes any AKA or maiden names associated with the patient’s URN
 . For example, if a female patient’s last name changed because of marriage, RCM Cloud®will search for the maiden and married last names.
- Last, First, and MI – Enter at least one letter of the patient or guarantor’s name in one of the name fields. More information entered in the name fields leads to a more targeted search result set. The search results display faster, and a smaller result set is easier to read.
- Enter any or a combination of the following
-
-
- MRN – Enter the patient’s Medical Record Number.
- DOB – Enter the birth date. Enter a four-digit year for a birth date prior to 1951; otherwise, enter a two-digit year.
- MRN – Enter the patient’s Medical Record Number.
- SSN – Enter the patient’s Social Security Number.
- Visit No – Enter the patient’s visit number.
- Recent Visit – Click to display only the most recent visit based on search criteria.
- All Visits – Click to display all visits matching the search criteria.
- Current Visits – Click to display only visits that have not been billed.
- Click List. All patients/visits matching the search criteria display.

- Click on a patient/visit to select it.
- Click Next. The Admitting Diagnosis page displays.
-


- Add visit for existing patient – Use the patient search to identify an existing patient and add a new visit that will be added to the reservation.
- Enter any or a combination of the following:
- Last, First, and MI – Enter at least one letter of the patient or guarantor’s name in one of the name fields. More information entered in the name fields leads to a more targeted search result set. The search results display faster, and a smaller result set is easier to read.
Note: The search includes any AKA or maiden names associated with the patient’s URN. For example, if a female patient’s last name changed because of marriage, RCM Cloud® will search for the maiden and married last names.
- Last, First, and MI – Enter at least one letter of the patient or guarantor’s name in one of the name fields. More information entered in the name fields leads to a more targeted search result set. The search results display faster, and a smaller result set is easier to read.
- Enter any or a combination of the following:
-
-
- MRN – Enter the patient’s Medical Record Number.
- DOB – Enter the birth date. Enter a four-digit year for a birth date prior to 1951; otherwise, enter a two-digit year.
- SSN – Enter the patient’s Social Security Number.
- Visit No – Enter the patient’s visit number.
- Recent Visit – Click to display only the most recent visit based on search criteria.
- All Visits – Click to display all visits matching the search criteria.
- Current Visits – Click to display only visits that have not been billed.
- Click List – All patients/visits matching the search criteria display.
-
-
- Click on a patient/visit to select it.
- Click Add Visit. The New Visit page displays. If there are Scheduling Defaults set for the selected department (in Ancillary Department Maintenance), they will display in the fields.

-
- Patient Type – Click the dropdown and select the patient type for the visit. The type must correspond with the Admit Type and is used to classify patients for room charging, the general ledger, and reporting.
- Service – Click the dropdown and select the service being performed during the visit. The service helps determine how the visit is charged if the patient is placed in a room/bed.
- Adm Source – Click the dropdown and select who or what entity (admissions source) is sending the patient to be admitted for the visit.
- Admit Type – Click the dropdown and select the inpatient or outpatient admission type for the visit. If an inpatient type is selected, an inpatient option must be selected in the Patient Type dropdown, and an outpatient option must be selected for an outpatient type.
- Click Next – The Admitting Diagnosis page displays.
- Patient Type – Click the dropdown and select the patient type for the visit. The type must correspond with the Admit Type

- Add a new patient and visit – Create a new patient and add a visit.
- Click New Patient. The New Patient page displays.

- Click New Patient. The New Patient page displays.
-
- Last, First, and MI – Enter the person’s name.
- Sex – Click the dropdown and select a sex. The address and contact information fields are enabled.
- SSN – Enter the patient’s Social Security Number.
- DOB – Click the field to enter the birth date directly or to select from a calendar.
- Street – Enter the mailing address. Information can be entered on multiple lines.
- ZIP Cd – Enter the ZIP code for the address (The City and State fields automatically populate.) or begin to enter the name of the city in the City field. An autocomplete list with all cities matching the entered letters displays (after two letters are entered). Click on a city to select it. The State and ZIP/PC automatically populate.
- Email – Enter a valid e-mail address.
- Phone – Enter the phone number, including the area code, into the field.
- Cell – Enter the phone number, including the area code, into the field.

-
- Click Next. The New Visit page displays. If there are Scheduling Defaults set for the selected department (in Ancillary Department Maintenance), they will display in the fields.
-
- Patient Type – Click the dropdown and select the patient type for the visit. The type must correspond with the Admit Type and is used to classify patients for room charging, the general ledger, and reporting.
- Service – Click the dropdown and select the service being performed during the visit. The service helps determine how the visit is charged if the patient is placed in a room/bed.
- Adm Source – Click the dropdown and select who or what entity (admissions source) is sending the patient to be admitted for the visit.
- Admit Type – Click the dropdown and select the inpatient or outpatient admission type for the visit. If an inpatient type is selected, an inpatient option must be selected in the Patient Type dropdown, and an outpatient option must be selected for an outpatient type.
- Click Next. The Admitting Diagnosis page displays.


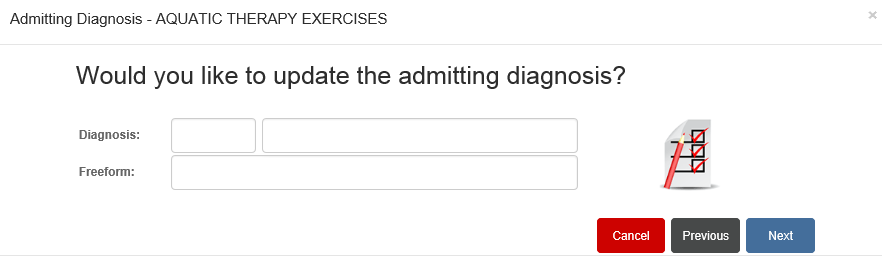
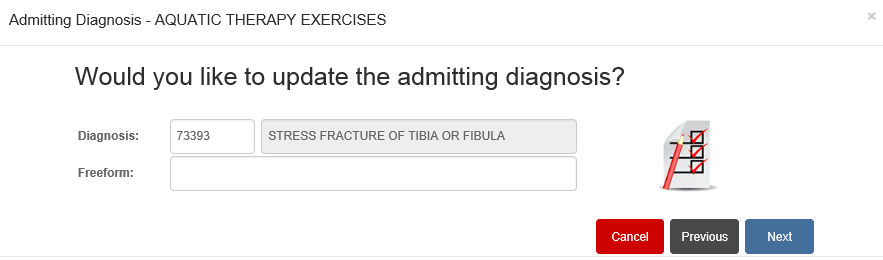
- If scheduling by dragging and dropping a visit on a reservation, the wizard opens to this page. If the visit already has an admitting diagnosis, it displays on the page. If not, enter the diagnosis by one of the following methods:
- Diagnosis – Enter a diagnosis code in the first field or a diagnosis description in the autocomplete field (clicking a suggested description to select it). For more information, see Autocomplete Fields.
- Freeform – Enter free-form text into the field.

- Click Next. The appointment is added to the Appointment Scheduler.

The following windows may also display:
- Time and Item Conflicts – If the patient’s appointment conflicts with another appointment because of the time scheduled or because of the item scheduled, the conflict displays in the Appointment Conflicts window. Click Yes to continue ordering the item or click No to cancel.
- Warnings – Any warnings for allergy, diabetic, male/female, or pregnancy conflicts with the item display in the Appointment Conflicts window. Click Yes to continue ordering the item or click No to cancel.
- Medical Necessity Check Failed – If Medical Necessity Checking is being used, the item will be checked against the visit diagnosis for a conflict.
- Item Preparations – If any preparations are associated with the item, they display in a read-only window and inform the patient or staff. Click OK to close the message.
Schedule Linked Appointments
The linked appointments functionality allows multiple items to be added for a visit in a single session, which allows a sequence of appointments, from various departments if needed, to be created for the patient. The items are added on the Item Information page of the Scheduling wizard, and they are indicated by a chain icon in the Appointment Scheduler.
Schedule Linked Appointments
To schedule linked appointments, follow these steps:
- Select an item in the QuickPick Items List, hold down the mouse button, drag it to a time slot on the Appointment Scheduler, and release the mouse button to drop the item onto the scheduler or right+click in the time slot on the scheduler and select Add Appointment. The Scheduling wizard opens to the Item Information page.
- Location – Displays the location for the department.
- Department – Displays the selected department. Click the dropdown to change the department.
- Item – For drag-and-drop scheduling, this field will be populated. If added in the scheduler, the item will need to be added. Enter an item ID in the first field or an item description in the autocomplete field (clicking a suggested description to select it).
- Start/End – Enter the start time for the appointment. Click the field to enter the date directly or click to select a date from a calendar. Then enter the time directly or click the clock icon to select a time. The End date/time defaults to the length of the item.
- Staff – In a resource view, the dropdown will default to the selected resource. In an appointment view, the dropdown will default to Any and includes any resources eligible to be scheduled for the item. Click the dropdown to select a specific resource.
- Click any of the following options, if needed:
- Av. Search – Click to launch the Availability Search to help select available times for the appointment.
- Prompts – Click to answer prompts specific to the item in the Prompts window. Note that when you click Next after completing the prompts, the wizard will advance to the Visit Search page.
- Verify – Click to verify that the item can be scheduled at the selected time. The verification checks the department availability, item availability, resource availability, and for conflicting appointments.
- Click the Add button
 . A row is added to the item list and the fields activate.
![]()
- Complete the item information.

- Click Next. The Visit Search page displays. This page also displays if you right+click on a reservation and select Add Visit.
![]()
- Select a visit via one of the following options:
- Search for existing patient/visit. Use the visit search to identify an existing patient/visit and add him or her to the reservation.
- Enter any or a combination of the following:
- Last, First, and MI – Enter at least one letter of the patient or guarantor’s name in one of the name fields. More information entered in the name fields leads to a more targeted search result set. The search results display faster, and a smaller result set is easier to read.
Note: The search includes any AKA or maiden names associated with the patient’s URN
. For example, if a female patient’s last name changed because of marriage, RCM Cloud®will search for the maiden and married last names. - MRN – Enter the patient’s Medical Record Number.
- DOB – Enter the birth date. Enter a four-digit year for a birth date prior to 1951; otherwise, enter a two-digit year.
- SSN – Enter the patient’s Social Security Number.
- Visit No – Enter the patient’s visit number.
- Recent Visit – Click to display only the most recent visit based on search criteria.
- All Visits – Click to display all visits matching the search criteria.
- Current Visits – Click to display only visits that have not been billed.
- Last, First, and MI – Enter at least one letter of the patient or guarantor’s name in one of the name fields. More information entered in the name fields leads to a more targeted search result set. The search results display faster, and a smaller result set is easier to read.
- Click List. All patients/visits matching the search criteria display.
- Click on a patient/visit to select it.
- Click Next. The Admitting Diagnosis page displays.
- Enter any or a combination of the following:
- Add visit for existing patient. Use the patient search to identify an existing patient and add a new visit that will be added to the reservation.
- Enter any or a combination of the following:
- Last, First, and MI – Enter at least one letter of the patient or guarantor’s name in one of the name fields. More information entered in the name fields leads to a more targeted search result set. The search results display faster, and a smaller result set is easier to read.
Note: The search includes any AKA or maiden names associated with the patient’s URN. For example, if a female patient’s last name changed because of marriage, RCM Cloud® will search for the maiden and married last names.
- MRN – Enter the patient’s Medical Record Number.
- DOB – Enter the birth date. Enter a four-digit year for a birth date prior to 1951; otherwise, enter a two-digit year.
- SSN – Enter the patient’s Social Security Number.
- Visit No – Enter the patient’s visit number.
- Recent Visit – Click to display only the most recent visit based on search criteria.
- All Visits – Click to display all visits matching the search criteria.
- Current Visits – Click to display only visits that have not been billed.
- Last, First, and MI – Enter at least one letter of the patient or guarantor’s name in one of the name fields. More information entered in the name fields leads to a more targeted search result set. The search results display faster, and a smaller result set is easier to read.
- Click List. All patients/visits matching the search criteria display.
- Enter any or a combination of the following:
-
- Click on a patient/visit to select it.
- Click Add Visit. The New Visit page displays. If there are Scheduling Defaults set for the selected department (in Ancillary Department Maintenance), they will display in the fields.
- Patient Type – Click the dropdown and select the patient type for the visit. The type must correspond with the Admit Type and is used to classify patients for room charging, the general ledger, and reporting.
- Service – Click the dropdown and select the service being performed during the visit. The service helps determine how the visit is charged if the patient is placed in a room/bed.
- Adm Source – Click the dropdown and select who or what entity (admissions source) is sending the patient to be admitted for the visit.
- Admit Type – Click the dropdown and select the inpatient or outpatient admission type for the visit. If an inpatient type is selected, an inpatient option must be selected in the Patient Type dropdown, and an outpatient option must be selected for an outpatient type.
- Click Next. The Admitting Diagnosis page displays.
- Add a new patient and visit. Create a new patient and add a visit.
- Click New Patient. The New Patient page displays.
- Search for existing patient/visit. Use the visit search to identify an existing patient/visit and add him or her to the reservation.
![]()
-
-
- Last, First, and MI – Enter the person’s name.
- Sex – Click the dropdown and select a sex. The address and contact information fields are enabled.
- SSN – Enter the patient’s Social Security Number.
- DOB – Click the field to enter the birth date directly or to select from a calendar.
- Street – Enter the mailing address. Information can be entered on multiple lines.
- ZIP Cd – Enter the ZIP code for the address (The City and State fields automatically populate.) or begin to enter the name of the city in the City field. An autocomplete list with all cities matching the entered letters displays (after two letters are entered). Click on a city to select it. The State and ZIP/PC automatically populate.
- Email – Enter a valid e-mail address.
- Phone – Enter the phone number, including the area code, into the field.
- Cell – Enter the phone number, including the area code, into the field.Click New Patient. The New Patient page displays.
- Click Next. The New Visit page displays. If there are Scheduling Defaults set for the selected department (in Ancillary Department Maintenance), they will display in the fields.
-
-
-
-
- Patient Type – Click the dropdown and select the patient type for the visit. The type must correspond with the Admit Type and is used to classify patients for room charging, the general ledger, and reporting.
- Service – Click the dropdown and select the service being performed during the visit. The service helps determine how the visit is charged if the patient is placed in a room/bed.
- Adm Source – Click the dropdown and select who or what entity (admissions source) is sending the patient to be admitted for the visit.
- Admit Type – Click the dropdown and select the inpatient or outpatient admission type for the visit. If an inpatient type is selected, an inpatient option must be selected in the Patient Type dropdown, and an outpatient option must be selected for an outpatient type.
- Click Next. The Admitting Diagnosis page displays.
-
-
- If scheduling by dragging and dropping a visit on a reservation, the wizard opens to this page. If the visit already has an admitting diagnosis, it displays on the page. If not, enter the diagnosis by one of the following methods:
- Diagnosis – Enter a diagnosis code in the first field or a diagnosis description in the autocomplete field (clicking a suggested description to select it).
- Freeform – Enter free-form text into the field.
- Click Next. The appointments are added to the Appointment Scheduler.

The following windows may also display:
- Time and Item Conflicts – If the patient’s appointment conflicts with another appointment because of the time scheduled or because of the item scheduled, the conflict displays in the Appointment Conflicts window. Click Yes to continue ordering the item or click No to cancel.
- Warnings – Any warnings for allergy, diabetic, male/female, or pregnancy conflicts with the item display in the Appointment Conflicts window. Click Yes to continue ordering the item or click No to cancel.
- Medical Necessity Check Failed – If Medical Necessity Checking is being used, the item will be checked against the visit diagnosis for a conflict.
- Item Preparations – If any preparations are associated with the item, they display in a read-only window and inform the patient or staff. Click OK to close the message.
View Linked Appointments
Linked appointments are also indicated by a chain icon in the Appointment tab. The user can view all linked appointments for a visit by clicking this icon or right+clicking on the appointment and selecting Linked Appointments.


The Linked Appointments window opens and displays all appointments scheduled together for this patient. Click on an appointment then click OK to load that appointment’s information.

