
Scheduling Overview and Workspace
- Using RCM Cloud
- Scheduling Overview and Workspace
- Scheduling Toolbar
- Scheduling Reservations / Appointments
- Cancelling Appointments/Reservations
- Arrive/Un-Arrive Patients
- Depart Patients
- Mark No-Show Patients
- Scheduling Appointment Tabs
- Scheduling Patient Tab
- Scheduling Visit Tab
- Scheduling Quick Actions
- Scheduling General Configuration
- Registration and the Registration Workspace
- Registration Work Queues
- Add New Patient
- Add Visit
- Register Pre-Admit Visit
- Registration Patient Tab
- Registration Patient Tab General Configuration
- Registration Visit Tab
- Registration Visit Tab General Configuration
- Registration Guarantor Tab
- Registration Insurance Tab
- Registration Insurance Tab General Configuration
- Registration Authorizations Tab
- Registration Authorizations Tab General Configuration
- Registration MSP Tab
- Registration Legal Tab
- Registration Workspace Quick Actions
- Medical Records Overview and Workspace
- Medical Records Abstracting Tab
- Medical Records Abstracting Tab General Configuration
- Medical Records Patient Tab
- Medical Records Patient Tab General Configuration
- Medical Records Quick Actions
- Collections Overview and Workspace
- Collection Collection Event Tab
- Collections Collection Event Tab General Configuration
- Collections Patient Tab
- Collections Patient Tab General Configuration
- Collections Insurance Tab
- Collections Insurance Tab General Configuration
- Collections Guarantor Tab
- Collections Guarantor Tab General Configuration
- Collections Visit Tab
- Collections Visit Tab General Configuration
- Collections Workspace Quick Actions
- Billing Overview and Workspace
- Billing Workspace Billing Event Tab
- Billing Workspace Billing Event Tab General Configuration
- Billing Patient Tab
- Billing Patient Tab General Configuration
- Billing Insurance Tab
- Billing Insurance Tab General Configuration
- Billing Guarantor Tab
- Billing Guarantor Tab General Configuration
- Billing Visit Tab
- Billing Visit Tab General Configuration
- Billing EOB/Denials Tab
- Billing Claim Error Tab
- Billing Quick Actions
- Payment Posting Overview and Workspace
- Payment Posting Work Queues
- Payment Posting General Configuration
- Payment Posting Line Item Detail Tab – Patient Payment
- Payment Posting Line Item Detail Tab – Insurance Payment
- Payment Posting Line Item Detail Tab General Configuration
- Payment Posting Insurance Tab
- Payment Posting Insurance General Configuration
- Payment Posting Visit Tab
- Payment Posting Visit Tab General Configuration
- Payment Posting Remit Detail Tab
- Payment Posting Quick Actions
- Master Application Security List
- Bed Board Search
RCM Cloud® Scheduling provides a robust appointment scheduling solution that can be configured to fit most any environment. Scheduling promotes the effective and timely scheduling of services and procedures and the resources required to perform those tasks.
Scheduling can create group and recurring appointments, allow for overbooking, perform conflict and medical necessity checks, put appointments on a waitlist, and generate reservations. When set up with departments, items, and resources (physicians, staff, rooms, and equipment), Scheduling provides an easy-to-use tool that incorporates all of that functionality automatically.
Scheduling a patient appointment, along with registering the patient, is the first step in the life-cycle of a patient visit. This introduces the patient into the system by gathering demographic information and sets an expected date/time that the patient will arrive for an item or procedure.
Scheduling information is shared throughout multiple locations and departments. Scheduled appointments use visits created in Registration and items configured in Order Management. Arriving a patient for a scheduled appointment generates an order, and charges are posted to the account based on the item’s charges.
The scheduling process begins with a reservation of date, time, and resources required for an item. When a patient is added to the reservation, it becomes an appointment. Appointments are scheduled within an Ancillary Department and are made up of the item, one or more resources, and the visit. Every appointment, like every item, must have a resource.

Items are the purpose of the appointment (for example, a chest x-ray) and are specific to the location and department. Items are configured to work with specific resource types (fixed, high-level classification of physician, staff, room, or equipment) and specific resource categories (user-defined subsets of the resource type), and they must be available. A resource is the actual physical person, room, or piece of equipment used to complete the item.
The Appointment Scheduler allows the user to schedule by drag-and-drop from QuickPick lists of items and patients. Tabs can be used to arrive patients and update order information, view prompts and appointment history, add the visit to a waitlist, and add alert codes, diagnoses, and procedures.
Quick Action options allow users to generate admit forms or attach images.
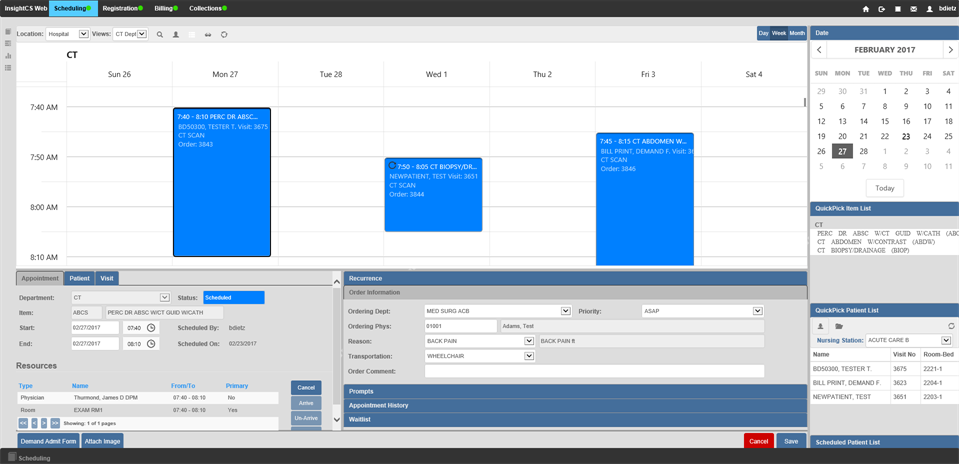
Scheduling Workspace
The Scheduling workspace gives the user access to the Appointment Scheduler and Quick Actions related to scheduling. It also includes the calendar and the item and patient QuickPick lists.
The Scheduling workspace is used to add reservations and appointments, and it can be used to update appointment, order, prompt, and recurrence information.
Using the Scheduling Workspace
The Scheduling workspace allows all items related to appointments to be configured and selected for easy scheduling or updating appointments. Various views and options shift with selections made in this interactive window. Most scheduling functions can be performed from the window, which offers a variety of views for appointments and resources.
The Scheduling workspace is comprised of the following sections:
- Appointment Scheduler – The central schedule where appointments and reservations are viewed, scheduled, and managed.
- Toolbar – Contains menus and buttons that control views in the Appointment Scheduler and a variety of scheduling options.
- Calendar – Determines the date viewed in the Appointment Scheduler.
- QuickPick Item List – Used to quickly and easily select items for scheduling.
- QuickPick Patient List – Used to quickly and easily select patients for scheduling.
- Scheduled Patient List – Displays all patients who have scheduled appointments in the current view.
The last selected view is displayed when launching Scheduling.

Appointment Scheduler
The Appointment Scheduler is the central component of the Scheduling workspace and is where appointments are scheduled, managed, and viewed. Appointments are displayed and scheduled through a variety of user-created views. There are two types of views in Scheduling — department-based view and resource-based view — which have the following differences:
- Department-based views display the full appointments on an ancillary department’s schedule, while resource-based views display full appointments on a resource’s schedule.
- If a department-based view is used, all resources for the appointment are scheduled automatically. If a resource-based view is used, the item must be scheduled using a view that correlates to the primary resource for the item. For example, if an MRI machine is the primary resource for an MRI item, use an MRI machine view. After selecting the primary resource for the appointment, all secondary resources are scheduled automatically.
The resource-based view is also a great tool for primary resource management on the appointments. Multiple resources can be displayed in the Appointment Scheduler, allowing easy updates on a primary resource’s scheduled appointment times.

Visual Indicators
When using the Appointment Scheduler, there are visual indicators to help communicate information regarding the schedule or appointment. The information displayed and order of information displayed in appointment blocks and tooltips can be customized using the Display Configuration application in InsightCS®.
- Appointments and reservations display in the Appointment Scheduler. Hover over the appointment/reservation to view the tooltip.

- Appointments are color coded (colors are set in the Scheduling tab in Profile Maintenance) to indicate their status. Reservations are light blue, and that color cannot be updated.
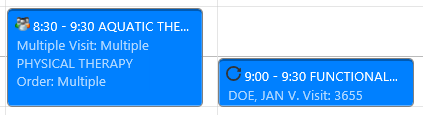
- The following icons indicate specific types of appointments:
 – A group appointment is signified by a multi-patient icon.
 – Recurring appointments are indicated by a recurring icon.
 – Linked appointments are signified by a chain link icon.
Change Time Interval on Screen
To change the time interval for the view, right+click on the left side of the Appointment Scheduler. A menu displays with various time interval options. Select an option, and the scheduler will automatically update. This overrides any default time limit set in the view or in the SCHED_TIME_INTERVAL Location Registry Key.

Scheduling Calendar
The Date calendar is used to select the date for the view in the Appointment Scheduler. It defaults to the current date. When selected, the view displays the schedule for the corresponding day, week, or month.

To select a date, click on it in the calendar or scroll through the dates using the keyboard arrow buttons.
To change the month, click the arrows on either side of the month at the top of the calendar or click the month itself to launch a list of months. Click to select the new month.

To change the year, click the arrows on either side of the year at the top of the calendar or click the year itself to launch a list of years for the current decade. Click to select the new year.
Click the Today button at any time to return to the current date.
QuickPick Item List
The QuickPick Item List is used to quickly select items for appointment scheduling. Items are categorized alphabetically by department and are specific to the user. Items can be scheduled by drag and drop from the list. A patient or patients are then added to the item to create an appointment.

The items that display are based on the current view and scheduling history. Appointments scheduled in a view are recorded, and as the user changes his or her view, the list updates to the items they have scheduled for that view in the past. The QuickPick Item List not only displays only those items relevant to the current view, it also displays the items that are most frequently scheduled by the user. This allows common items to be scheduled quickly and conveniently.
QuickPick Patient List
The QuickPick Patient List is used to quickly identify and select patients for appointment scheduling based on nursing station or recently admitted lists. Patients can be scheduled by drag and drop from the list, adding them to reservations that have already been scheduled on the Appointment Scheduler.
The following options are available to view patients within the QuickPick Patient List:
 By nursing station (inpatients/outpatients admitted to rooms)
 By recent registrations (inpatients/outpatients admitted within the previous 24 hours)
The lists can be refreshed by clicking the refresh button ![]() .
.

View Patients by Nursing Station
To view a patient list by nursing station, follow these steps:
- Click the Nursing Station button. The Nursing Station dropdown displays.
- Nursing Station – Click the dropdown and select a nursing station. Results display below the dropdown.

View Patients by Recent Registrations
To view a patient list by recent registrations, follow these steps:
- Click the Recent Registrations button. The Mine option is selected by default.
- Select on of the list options:
- Mine – Displays all patients registered by the current user from midnight the previous day to the current date/time with their name, visit number, and registration date/time (date/time the visit was created).

-
- All – Click to display all patients registered from midnight the previous day to the current date/time with their name, visit number, and registration date/time (date/time the visit was created).

