
Scheduling Toolbar
- Using RCM Cloud
- Scheduling Overview and Workspace
- Scheduling Toolbar
- Scheduling Reservations / Appointments
- Cancelling Appointments/Reservations
- Arrive/Un-Arrive Patients
- Depart Patients
- Mark No-Show Patients
- Scheduling Appointment Tabs
- Scheduling Patient Tab
- Scheduling Visit Tab
- Scheduling Quick Actions
- Scheduling General Configuration
- Registration and the Registration Workspace
- Registration Work Queues
- Add New Patient
- Add Visit
- Register Pre-Admit Visit
- Registration Patient Tab
- Registration Patient Tab General Configuration
- Registration Visit Tab
- Registration Visit Tab General Configuration
- Registration Guarantor Tab
- Registration Insurance Tab
- Registration Insurance Tab General Configuration
- Registration Authorizations Tab
- Registration Authorizations Tab General Configuration
- Registration MSP Tab
- Registration Legal Tab
- Registration Workspace Quick Actions
- Medical Records Overview and Workspace
- Medical Records Abstracting Tab
- Medical Records Abstracting Tab General Configuration
- Medical Records Patient Tab
- Medical Records Patient Tab General Configuration
- Medical Records Quick Actions
- Collections Overview and Workspace
- Collection Collection Event Tab
- Collections Collection Event Tab General Configuration
- Collections Patient Tab
- Collections Patient Tab General Configuration
- Collections Insurance Tab
- Collections Insurance Tab General Configuration
- Collections Guarantor Tab
- Collections Guarantor Tab General Configuration
- Collections Visit Tab
- Collections Visit Tab General Configuration
- Collections Workspace Quick Actions
- Billing Overview and Workspace
- Billing Workspace Billing Event Tab
- Billing Workspace Billing Event Tab General Configuration
- Billing Patient Tab
- Billing Patient Tab General Configuration
- Billing Insurance Tab
- Billing Insurance Tab General Configuration
- Billing Guarantor Tab
- Billing Guarantor Tab General Configuration
- Billing Visit Tab
- Billing Visit Tab General Configuration
- Billing EOB/Denials Tab
- Billing Claim Error Tab
- Billing Quick Actions
- Payment Posting Overview and Workspace
- Payment Posting Work Queues
- Payment Posting General Configuration
- Payment Posting Line Item Detail Tab – Patient Payment
- Payment Posting Line Item Detail Tab – Insurance Payment
- Payment Posting Line Item Detail Tab General Configuration
- Payment Posting Insurance Tab
- Payment Posting Insurance General Configuration
- Payment Posting Visit Tab
- Payment Posting Visit Tab General Configuration
- Payment Posting Remit Detail Tab
- Payment Posting Quick Actions
- Master Application Security List
- Bed Board Search
The Toolbar contains menus and buttons that control views in the Appointment Scheduler and a variety of scheduling options. The View dropdown and time frame buttons (Day/Week/Month) help configure the display to make it easier to schedule appointments or manage specific resources, while other options access the availability search, appointment search, waitlist, and reservation generator.
![]()
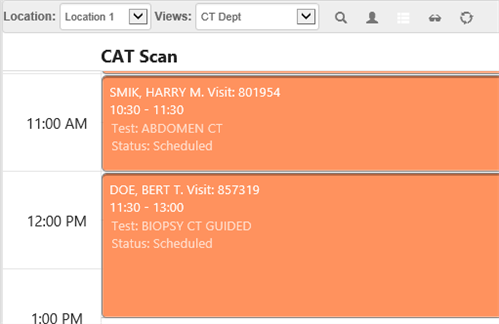
Location Menu
The Location menu is used to select the location for the schedule. It displays appointments scheduled for all selected departments or resources within the selected location. The Location menu lists only the locations that are assigned to the user or user’s role (in User Maintenance).

Views Menu
The Views menu is used to select the appointment or resource view for the selected location. The view affects how appointments are scheduled and displayed. They are specific to the user who created the view.
The department-based view displays appointments in a departmental context for the scheduling departments assigned to the user. When an item is scheduled in this view, all of the item’s resources are scheduled simultaneously. The resource-based views display a primary resource’s schedule. When an item is scheduled in this view, only the selected resource is displayed, but all resources are scheduled.
Click the Views dropdown to change the view, which will also update the QuickPick lists. A view can display multiple departments or resources in the Appointment Scheduler.

Toolbar Buttons
The toolbar buttons provide a variety of viewing options and scheduling functions. The calendar and timeline buttons adjust the amount of days displayed in the Appointment Scheduler, while other buttons activate the waitlist functionality or launch scheduling windows.
 Availability Search – Click to open the Availability Search window, which is used to search for open availabilities for primary resources.
 Patient Appointment Search – Click to open the Patient Appointment Search, which allows the user to search for a patient by name, Social Security number, Medical Record Number, or visit number.
 Waitlist – Click to activate the view for the Waitlist feature, which is a queue designed to hold patient appointments that need or prefer an earlier day/time, if the opportunity arises.
 Views icon – Click to add or update scheduler views.
 Reservation Generator – Click to open the Reservation Generator, which allows the creation of multiple reservations at the same time. This is useful for scheduling special recurring events, such as classes or training sessions, where the participants may vary.
 Day – Click to display a one-day time frame, showing the hours in the day, on the Appointment Scheduler. This is the typical and default view for a tab.
 Week – Click to display a seven-day, or full week, time frame on the Appointment Scheduler.
 Month – Click to display the entire month on the Appointment Scheduler. This is most often used when changing an appointment to a later date.
Availability Search
The Availability Search window and functionality allows searches for open availabilities for scheduling an item and/or resource. It lists all available times to schedule an appointment based on existing appointments and availability for the item, department, and resource.

Along with the Availability Search button in the toolbar, the Availability Search window can also be opened by right-clicking on the Appointment Scheduler in any view (appointment- or resource-based) and selecting Availability Search.

Perform Availability Search
To perform an availability search, follow these steps:
- Click the Availability Search icon in the toolbar or right+click and select Availability Search. The Availability Search window displays.

- Location – Defaults to the location for the selected view.
- Dept – Click the dropdown and select the department for the item and resource.
- Item – Click the dropdown and select the item to be scheduled.
- Resource – Click the dropdown and select a specific resource or select Any to search all resources associated with the location, department, and item.
- Start – Defaults to the current date as the starting point for the search. Click the field to enter the date directly or click to select a date from a calendar.
- Select a search length option from the following:
- To Next Day – Click to search until the end of the following day.
- To Date – Click to search up to a specific date/time. This defaults to the current date/time. Click the field to enter the date directly or click to select a date from a calendar.
- Click the List button. The search results display.

- Click on an open time to select it.

- Click OK. The Scheduling wizard opens and allows you to create a reservation or appointment.
Patient Appointment Search
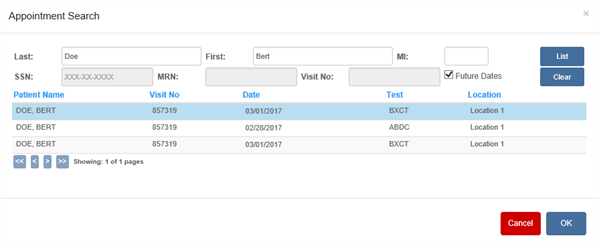
The Appointment Search window allows the user to search for existing appointments for patients. The search can be conducted by name, Social Security Number, Medical Record Number (MRN), or visit number.

Perform Appointment Search
To perform an appointment search, follow these steps:
- Click the Patient Appointment Search button in the toolbar. The Appointment Search window displays.
- Enter or select any or a combination of the following:
- Last, First, and MI – Enter at least one letter of the patient’s name in one of the name fields. More information entered in the name fields leads to a more targeted search result set. The search results display faster, and a smaller result set is easier to read.
Note: The search includes any AKA or maiden names associated with the patient’s Unit Record Number (URN). For example, if a female patient’s last name changed because of marriage, RCM Cloud® will search for the maiden and married last names.
- SSN – Enter the patient’s Social Security Number.
- MRN – Enter the patient’s Medical Record Number.
- Visit No – Enter a valid visit number for the patient.
- Future Dates – Selected by default to display only appointments on the current date or later. Uncheck to view all appointments for the patient/visit.
- Click List. One of the following happens:
- A message displays, stating “The given search parameters yielded no results. Please try searching with different criteria.” Click OK to close the message and search again.
- The appointment or multiple appointments display, depending on the search criteria entered.
- Click on an appointment to select it.
- Click OK.
- The selected appointment is highlighted in the Appointment Scheduler and its information populates the Appointment, Patient, and Visit tabs.
Waitlist Appointments
The Waitlist is a queue designed to hold patient appointments that need or prefer to be rescheduled an earlier day or time. The waitlist process has two components:
- Scheduled appointments are added to the waitlist using the Waitlist child tab.
- The user accesses a day view for a department or resource (physician, staff, room, and equipment).The Waitlist button in the toolbar is white and disabled when there are no waitlist requests or if the view is not a day view. The button will be black and enabled where there are pending waitlist requests. Waitlisted appointments can be rescheduled for future dates but not the current date. The waitlist takes into account item and department availability when determining open time slots.

Reschedule a Waitlisted Appointment
Once an appointment has been placed on the waitlist, schedulers can view potential new appointment times and reschedule the appointment. This can only be done using a day view and for future dates (not for the current date). To reschedule a waitlisted appointment, follow these steps:
- In the Appointment Scheduler, click the Day view button. If there are existing waitlisted appointments, the Waitlist button will be enabled.
- Click the Waitlist button . The Waitlist Appointments window displays and lists all eligible appointments, the basic appointment information, and the time available on the selected day.

- Click on the appointment to select it.
- Click Save. The appointment is moved to the new time.
Add/Update Scheduling Views
Views determine the department(s) or resource(s) available in the Appointment Scheduler. Views can be built as department views, which schedule for an entire department or departments, or as resource views, which schedule for a specific resource or resources (for example, rooms available for the radiology department). For a department view, the department name displays in the Appointment Scheduler. For a resource view, the resource name displays in the scheduler.
Views are unique to the user who created them, meaning other users cannot access views created by other users.
Add Scheduling View
To add a view, follow these steps:
- Click the Views
 button. The Views window displays with the Name dropdown enabled.

- Click Add. The Name field and Location dropdown are enabled, and the View option defaults to Appointment.
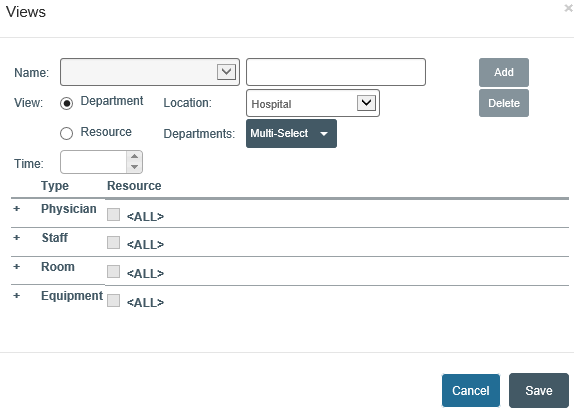
- Name – Enter the name for the view. This will display in the Views dropdown in the toolbar.
- Location – Click the dropdown and select the location for the view.
- Multi-Select – Click the menu and select a department or departments. When selected, a checkmark appears to the right of the department. Click Check All to select all of the departments or click Uncheck All to clear the selections.

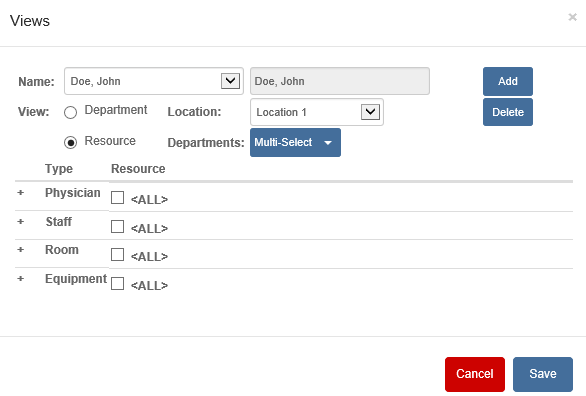
- Select a view type option:
- Department – Select for a department view, where all resources for the scheduled item are assigned automatically.
- Resource – Select for a resource view, which allows you to then select specific resources below. Click the All option or click the + to expand the resource type and check specific resources to display in the view.

- Time – Click the arrows or enter a specific time interview for the view grid. The intervals are set in increments of 5 minutes.
- Click Save. The view is added to the Views dropdown in the toolbar. In the example below, the new view has been selected.

Update a view
To update a view, follow these steps:
- Click on the Name dropdown and select the view.

- Update the view type and/or individual resources.
- Click Save.
Delete a View
To delete a view, follow these steps:
- Click on the Name dropdown and select the view.
- Click the Delete button. The view is deleted and, if it was selected, is cleared from the Views dropdown in the toolbar.
Reservation Generator
The Reservation Generator is used to create multiple reservations at the same time. The reservations are scheduled by department, item, and resource. The Reservation Generator can be used for individual or group reservations and is helpful for scheduling large numbers of classes or sessions where the participants may be different each time.
Although recurring reservations are set up similarly to recurring appointments, they are not linked together like recurring appointments. Each must be individually updated or deleted, if needed.

To add reservations, follow these steps:
- Location. The location defaults to the location selected in the user’s current view.
- Department. Click the dropdown and select the department. Options may be limited based on the currently selected view and the user’s scheduling departments.
- Item. Click the dropdown and select the item.
- Resource. Click the dropdown and select the primary resource. The Department and Item must be defined before a primary resource is entered.
- Select the reservation type:
- Individual – Select for an individual reservation.
- Group – Select for a group reservation. When selected, the Max Visits field is enabled.
- Max Visits – Enter the maximum number of visits allowed to be scheduled for the group appointment.
- Select a recurrence pattern to determine how often the appointment will occur from the following options:
- Daily. Select to set up a reservation that occurs every day of the week or at a specific interval. Then, choose from the following:
- Every_days(s). Click the option and enter or use the arrows to set the gap in days between reservations. The field must have a number greater than zero.
Example
If a reservation is scheduled on Wednesday and 2 is entered into the day(s) field, the next reservations occur on Friday, Sunday, Tuesday, etc.
-
- Every weekday. Click the option to schedule the reservation at the same time Monday through Friday.

- Weekly. Select to set up a reservation that occurs at specific times on specific days every week or over a specific interval of weeks. Then, complete the following:
- Recur every_week(s) on. Click the option and enter or use the arrows to set the gap in weeks between reservations. The field must have a number greater than zero.
Example
If 1 is entered into the week(s) field and Wednesday is selected, the reservations occur on Wednesday every week.
-
- Click on a day or days for the appointment.

- Monthly. Select to set up a reservation that occurs on a specific date (for example, the 10th of the month) or day (for example, the first Wednesday) each month. Then, choose from the following.
- Day_of every_month(s). Click the option and enter or click the arrows to set the day and then the monthly interval.
Example
If a reservation is scheduled for March 5 and 5 is entered into the Day field and 1 into the month(s) field, the next reservations occur on April 5, May 5, etc.
-
- The_ _of every_month(s). Click the option, click the positional drop-down menu to select the position (first, second, last, etc.), and click the daily/weekly drop-down menu to select the day (day, weekday, specific day, etc.). Enter or use the arrows to set the gap in months between reservations.
Example
If a reservation is scheduled for Thursday, March 1, 2012, First and Weekday are selected from the drop-down menus and 1 is entered into the month(s) field, the next reservations occur on April 2, May 1, etc.

- Start – The start date defaults to the current date. Enter or use the date picker to select a new date to start the range of recurrence.
- Select an end option from the following:
- End After_occurrences – Click the option and enter or use the arrows to set the number of occurrences in the occurrences field.
- End By – Click the option and enter the date directly or click to select a date from a calendar to select a specific date to end the recurring appointments.
- Start Time – Click the dropdown and select the start time for the reservations. The Duration field displays the default length of the item.
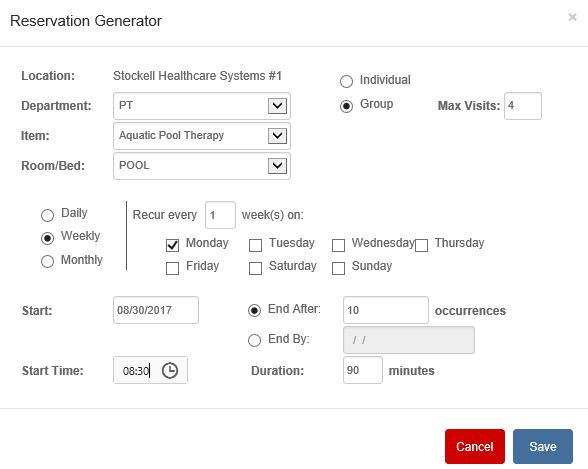
- Click Save. The reservations are added to the Appointment Scheduler.
